Interactive Stylized
Water Shader
(Made with Unity)
Scripts:
Effect List
1. make the water surface go up and down over time;
2. make the water surface texure distort with Noise map;
3. make white edges (foam line) where water and other objects intersect;
4. make trails for objects moving on the surface.
Additional addons:
5. move the ball with wasd!
6. making the ball always float on the surface no matter how high the wave!
7. string effect to make the ball bounce a little when back to the surface!
8. caustic projector found on MinionsArts website!
Intro
Water shader can be extremely difficult as it requires approximating complex physical effects like reflection, refraction, and waves with techniques like vertex displacement, normal maps, and tessellation.
But as someone who just stepped into the world of shader, is there any simple way to make the water not only look good but also interactive? Absolutely!
Inspired by WaterShader of @Minions Arts, I changed some parts of it's original code and managed to make an interactive stylized water shader effect, objects can leave a trail on the water surface as ripples that diffuse over time. (I will focus on what MinionsArts did not explain in the post and also what I added!)

First, how do we make the water surface go up and down?
In the picture above, the equation is Sine of v.vertex.x * v.vertex.z, basically we are trying to make every vertex on the surface plane move in a sine form (S shape) and we perform this on both x and z coordiates of a vertex which will end up looking like the plane is waving on two directions at the same time.
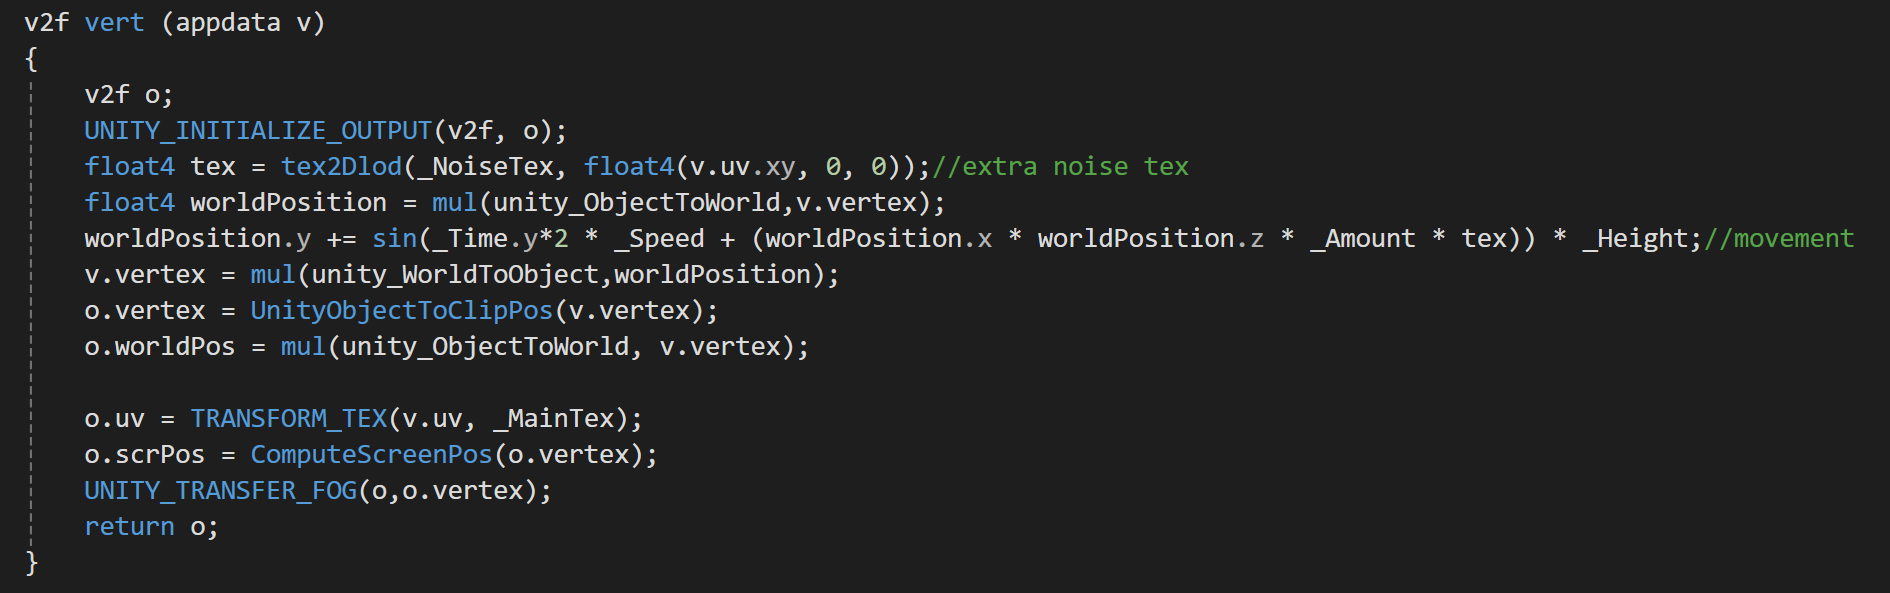
UNITY_ INITIALIZE_OUTPUT(v2f, o) ; means set the value of every variable in the v2f struct as 0. Unity will give a random value to the variable if you didn’t assign any value to it. So this procedure prevents any unwanted error.
We use the water verts’ UV to sample the noise map, by mul(_NoiseTex, float4(v.uv.xy, 0, 0));
Now before we use the equation on v.vertex, we need to transform v.vertex from object space to world space. The reason why is that we want the plane to wave in the world space instead of object space. Think about the difference, if we directly perform the wave equation, the vertex moves in the object space that means if we rotate or scale the object, the wave rotate and stretch too. Also if we want multiple water meshes to have the same exact wave form, transforming into world space will do the trick.
Then it’s time to do the equation.
worldPosition.y += sin(_Time.y*2 * _Speed + (worldPosition.x * worldPosition.z * _Amount * tex)) * _Height;
This equation is based on y=A⋅sin(ωt+ϕ(x,z))
sin is what causes the oscillating motion;
_Time.y * 2 * _Speed (y*2 is just the y value in Time *2 because I wanted to make the wave faster but _Speed has the same effect, and the 4 values in _Time is set by Unity FYI),this part makes the wave move up and down with time;
+ (worldPosition.x * worldPosition.z * _Amount * tex) “+” is a phase offset it decides where it sits on the sine wave(imagine moving the sine wave along the x axis), and x*z indicates the position in the world space, but more importantly, the value of x*z is unique at every vertex that means by adding the x*z value we can tell where exactly this vertex is on the sine wave at this time. And because x and z are changing continuously on the plane, the sine wave is also continuous despite added by x*z;
_Amount can be seen as the frequency of the waves, the larger this value is, the more waves there are in certain distance range. Say sin(kx), k is frequency,and the period length of sin(x)is 2π, by multiplying k, the period becomes 2π/k, that’s why the bigger k is, the more waves there are in certain distance range because the period of the wave cycle is shorter.
tex is the noise map, by multiplying this, it creates a randomness in waves based on the noise map color offset instead of a perfect shaped wave just like the sine shape.
_Height only affects how high or low the peak of the wave is that’s why it’s out side of sin because it doesn’t affect the phase change.
Great! Now we have a wavy water plane! ( The plane used in the image below has low resolution that’s why the waves look a little sharp)

But we do need to transform v.vertex back to object space because Unity sends vertex position to vertex shader in object space,technically we can use either world or object space here as long as we transform it into clip space at the end, but since I do want to follow the original code, I transformed it back to object space here. If I directly send worldspace position, later when UnityObjectToClipPos(v.vertex); Unity doesn’t know it’s already in world space so it’ll be transformed again which end up make your mesh in a wrong position. (MinionsArts did it in object space though, but I believe it’s better in world space)
Second, let us distort the main texure of the water with Noise map.
fixed distortx = tex2D(_NoiseTex, (i.worldPos.xz * _Scale) + (_Time.x * 2)).r;
half4 col = tex2D(_MainTex, (i.worldPos.xz * _Scale) - (distortx * _TextureDistort));
(See code line 89 and 90)
distortx is the value of the noise texture sampled in world space. (attached return distortx picture)
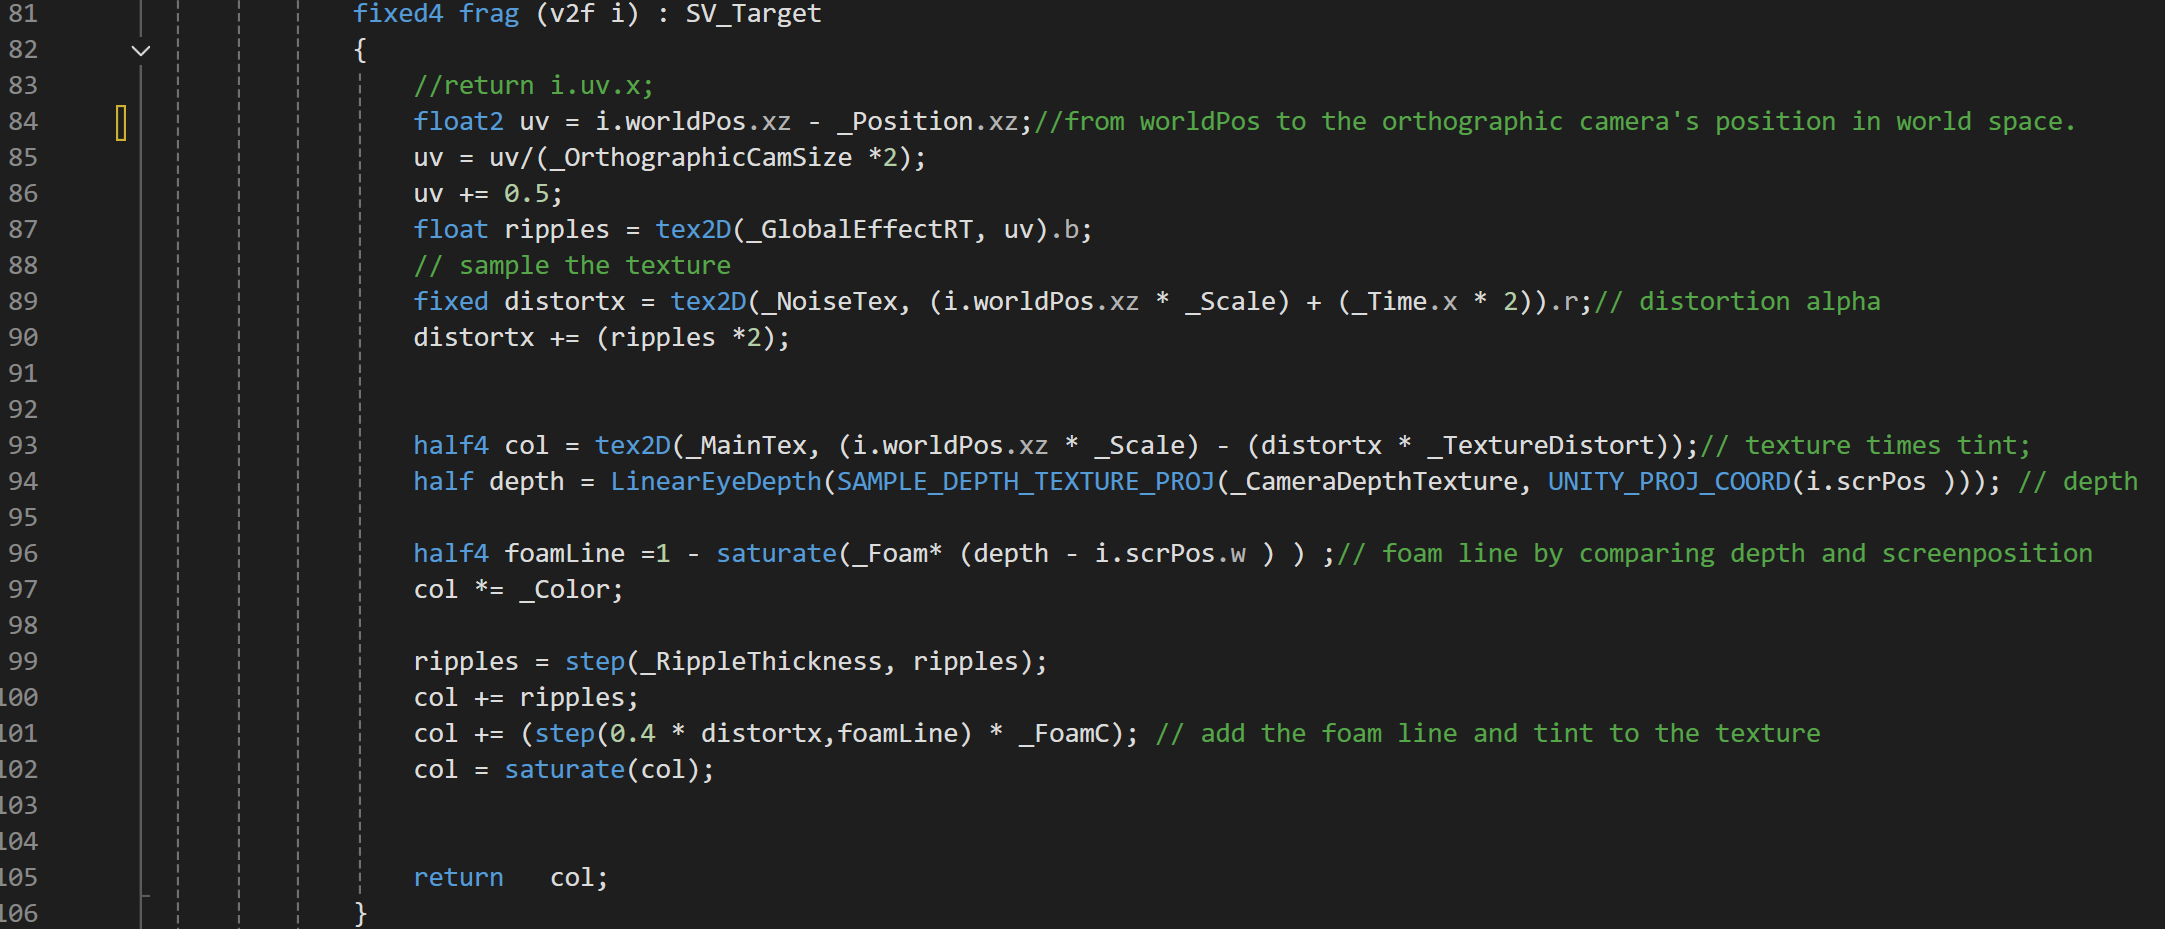
What 89 and 90 are doing is using the world position of that pixel to sample the grey value of the noise map, and then multiply _Scale to be able tomanually change the scaling of the noise map in the inspector. Also, minus _Time to create an offset of the noise map over time so the distortion is more unpredictable and random. (See the “return distortx;” image above, the noise map is constantly moving) *2 is just because we want it to move faster.
“ripples” is a texture we projected onto the water plane as a rendertexture which we will cover later in the “leave trail” part. Now you just need to know according to line 90, distortx also affected by ripples. And by adding this, the distortion on the ripples will be even more intense and obvious than other positions.
Now we can use the distortx value to distort the main water texture. (Line93)
Sample the color at i.worldPos on the MainTex, and minus(offset) distortx * _TextureDistort. _TextureDistort is the value we defined to manually adjust the intensity of the distortion effect. By multiplying this value, distortx is boosted!
And that’s how you distort the water texture! (See the before and after difference below!)

Next up, foam line…(See the intersection of water and objects above! There’s that white foamline)
foamLine = 1 - saturate(_Foam * (depth - i.scrPos.w));
After aquiring the depth from the pixel to the main camera from line 94, we can use the equation above. depth of the scene minus the depth of the pixel in clipspace(this determines where to create that line), times intensity(thichness). saturate means the value can only be (0-1), and this whole thing is subtracted by 1, which means the greater _Foam is, the thinner the foamline is.
The color of the foamline also the ripples, is determined from line 97 to 102. _Color is a value user can set to apply to the maintexture including the foamline and ripples on top of its original color.
Line 99 makes the foam line color either 0 or 1, meaning it’s either visible or invisible.
Line 101, this is kind of a personal use of distortx by Minions Arts just to bring in some randomness to the thickness of foamline, 0.4 is just a random number.
See the white foam below.
For the trails…
There are mostly three parts of how we are going to achieve this, particle system, rendertexture and shader. For this part MinionsArts made it super clear on how to setup everything here. (For details visit MinionsArts website)
First we can add a particle system to the object we wish to interact as its child. With proper setup, the object should now leave trails wherever it goes.
The technique we are going to apply in the second part is basically put an orthographic camera right above the water plane and with certain scaling based on our camera height, we can sample it as a RenderTexture uv map. Minions Arts had great illustration of the orthographic camera and the code here. Here’s what it looks like in the scene

Now that we have this map we could use it in the water shader so that as long as within the range of the rendertexure, any object with the same particle system can leave a trail ON the watersurface since it’s in the shader of the watersurface.
Moving the ball with WASD is pretty simple as shown below…

But one thing worth mentioning is that here I chose to use Rigidbody which is only giving the ball a velocity( movespeed * direction vector) and then the physics system inside of the Unity Engine will do the rest. Reason why I didn’t directly override the ball’s transformation is because if I did the ball will go through the walls because RigidBody doesn’t have control over the ball’s transformations anymore.
Ballfloat Script and Spring Effect…
The ball can move on the surface freely with WASD and leave a beautiful trail now, but problem occurs when we increase the wave height. The ball only stays on the original height of the water surface. But the y value of the watersurface changes over time. So, we need to update the ball’s y value based on where it is on the water plane and the water vertex’s current y value.
To do that, we need to do the same math worldPosition.y += sin(_Time.y*2 * _Speed + (worldPosition.x * worldPosition.z * _Amount * tex)) * _Height; in a new script called watermanager.cs.

The idea is we have a script that contains all the parameters of the water surface including the transform information of any vertex so that any adjustment or any value we need can all be aquired and executed through this watermanager.cs.
Now, in another script called ballfloat.cs, we can just call WaterHeightAt to get the y value at (x,z).
“offsetFromWater” is for the objects like the rubber duck which the center pivot is above the water surface instead of on it.
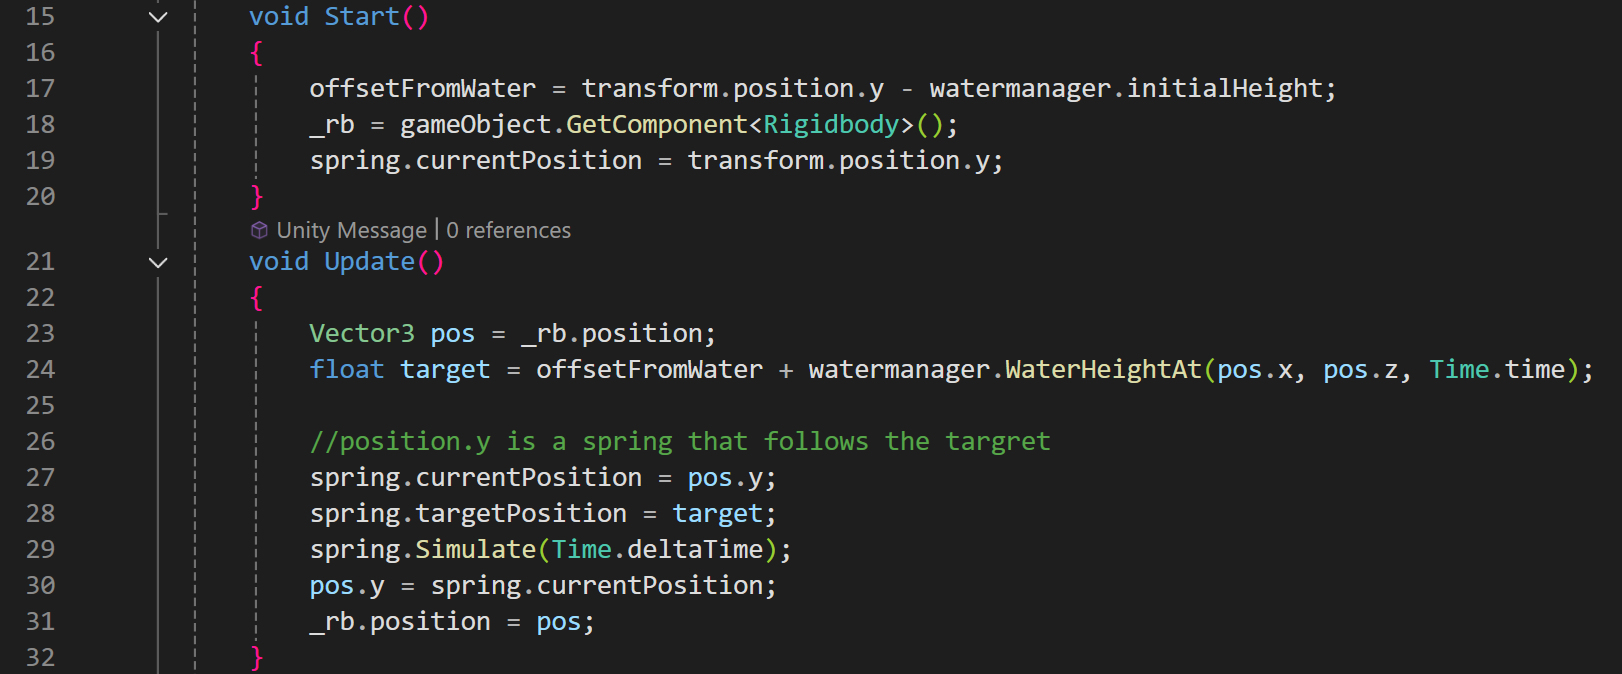
Now that the ball can follow the surface, but it does look “rigid” because when there are waves, the ball is not suppose to follow the surface that perfectly. Since simulating the actual physics is a lot more complicated, the easier solution is applying a spring effect. The function “Simulate” here is the simplespring.
The script of the simple spring effect is here.
The script gives the object a target position and then the object will move to the target with the spring effect. And here we specifically want the target position to match the transforms of the water vertex at that position, at the moment. Therefore we need another script called SpringToTarget.cs to update the target position of the spring as shown below.

Congrats! A cool stylized water pool scene is ready for lots of fun!
Check out the realistic version of this project here!